Squirt Plans

Squirt Plans

Sunday, November 1, 2015

Overdue Update! 1956 Speed Queen Addition

So time has flown by the last year and I've been slacking on the Squirt project. I always wondered why some builders would take a few years to finish such a small boat, well now I know! Between a new job, new house, new boat project (see below), and busy wedding season it didn't leave me much time. Summers in Michigan go by too fast.

Concerning the Squirt, I've faired the hull smooth and encapsulated it with some coats of epoxy. I'm finally happy with the current status and am official ready for paint! I'm not sure how many times I've said that but I'm feeling pretty confident this time. I also took the Squirt to a boat show this spring in South Haven, along with my Mark 20 and Mark 20H (I also made it to the Spring Lake boat show but was sadly rained out).

As for my other project, I found a 1956 14' Speed Queen for sale on Craigslist for $100 and couldn't pass it up. Maybe it was the caffeine in that mornings coffee, but the duel benches and classic lines screamed potential. The Speed Queen is one of the first fiberglass models to come into production and it's super light (a 15 year old and I were able to carry it around the parking lot) with a fun layout. 

When I got it home I power-washed it, removed the cap, cut out the bench supports and transom, and started sanding. Click here to see more pictures on the entire process. My plan was to paint the Squirt and the Speed Queen at the same time but I ran out time. 

Unfortunately this will likely be the last update until Spring. I'm currently looking for a heated work space to continue the Squirt over winter, but it's hard to find a space large enough that won't break the bank. 

 Squirt at the South Haven Boat Show, along with my Mark 20 and Mark 20H

How I found the Speed Queen

Driving her home

After removing the cap, rotten bench supports, rotten transom, rotten stem

Ad from 1956, powered with a Mark 55. I won't be putting a windshield on

Monday, May 19, 2014

Building Resumes

After about 3 months of negotiating and dealing with the bank I bought a house that has the perfect garage for me to continue my Squirt build. I'm in the process of setting up a workshop and the build will resume shortly, hopefully this weekend.

The Squirt held up great over winter and after spending some time inspecting it, I'm going to continue with the painting process. I've also decided to add another coat of epoxy as I'm hoping to give the hull more of a base for sanding. Next I'll apply the fairing compound and once smooth, I'll add the primer.

As you'll see in the picture below, I picked up another boat. It's a 1967 Cherokee with a late 1960's 40 hp Evinrude. I bought it cheap at an auction and am probably going to do a quick turn around and sell it. I've only been in my house for a few weeks and the garage is already starting to fill up!


Thursday, September 19, 2013

Painting On Hold

After I flipped the boat I sanded the hull one last time. I started with a pass over with 150 grit and then switched to 180, using an orbital sander. Everything was pretty smooth by the time I finished but still I wanted to take out any low spots. I used a fairing compound from West System that was easy to work with. My only problem was I didn't make enough. I ended up having to do a second batch to finish and luckily everything worked out. To spread the compound I used two 6" cheap plastic squeegees, placing one over the other to make it stiffer. I would definitely recommend spending a few extra bucks and getting a nice one.

After I had finished applying the fairing compound I ran into my problem. I'm currently using my parents garage to hold my Squirt, which is fairly small, but I was planning to make a plastic sheeting-room inside to do my painting. The problem is my dad also uses the garage to hold his wine, in which he uses a wine cabinet that has an AC unit to keep the temperature controlled. This AC unit needs to have a decent amount of free space to intake air, as well as to blow it out. Because of this my plastic-sheeting room would need one side to be clear of the AC unit which would then blow dust all over the garage. I found this out the day after I applied my fairing compound and found dirt, grass, and anything else floating around which had found its way into the wet compound.

Unfortunately this means I won't be making my September splash date but it does mean I won't have to rush to complete it anymore. I'm currently in the process of finding a different place to work on it hopefully I'll be posting soon with some good news!

EDIT: Here's my working space. The picture is before the flip but you can still get an idea. You can see the wine cabinet on the very right side of the photo.


Saturday, August 31, 2013

Plywood Decking Installed, Flipped to Paint

I was finally able to finish installing the decking after being out for most of last week with the flu. The process started by fairing the sub-decking. I wanted a rounded dashboard and a decking curve to match, so I left the dashboard slightly raised. Next I laminated any decking that was still bare. I was really surprised how much epoxy the wood soaked up, but two coats left it looking really nice and saturated. After came the installation. I did the large piece over the bow along with a small piece next to it all at once, and then did the rest of the decking during a second time. I used a combination of screws and weights to hold the decking in place while the epoxy set.

I also cut out the hatch for the gas tank. Using an utility knife I traced the hatch and cut along my lines, making passes until my knife was through. It worked pretty well and made nice straight cuts.

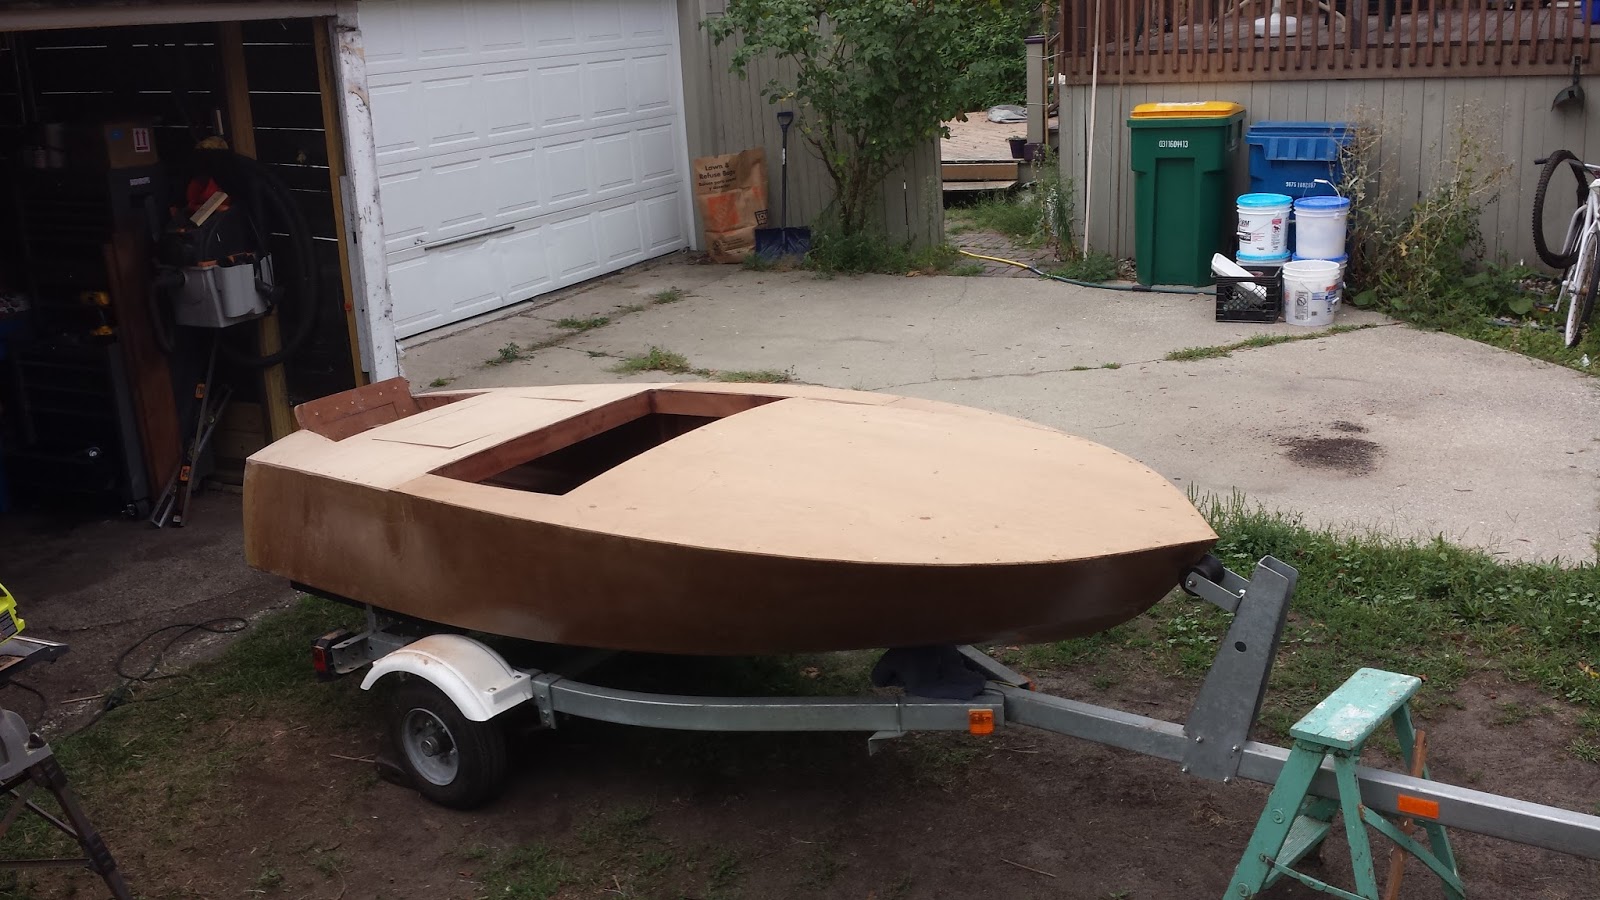
I flipped the boat today and have started sanding. Next I'll use a fairing compound to fill any low spots, and hope to get my garage ready to paint. There's not much room so I'll have to get creative.


Friday, August 16, 2013

Music Installation (BIG Jambox)

While I was waiting for some more plywood to come in I started to mess around with the music situation. This spring I purchased a marine battery to go with two marine speakers and a deck I had from a previous boat. My original plan was to put the marine battery in the back of the boat next to the gas tank and mount the two speakers and deck somewhere under the plywood decking towards the tip of the bow. After getting the outboard on I decided there would likely be too much weight in the back of the boat and started to worry about proposing and planing ability.

I decided to look into a wireless speaker. I came across the 'BIG Jambox' and after reading some reviews I purchased it ($249). It's pretty pricey but it's compact, light weight, and has decent sound (great high end but not the best low end). Another thing I liked was its Bluetooth capabilities. All I have to do is turn on the Big Jambox, turn the Bluetooth setting on in my phone, and I'm ready to play music. This will work great for streaming Pandora. Of course, the BIG Jambox also has an AUX cable so I can plug it into an mp3 player.

I made a box for it, with room around the speaker but still a snug fit, and then mounted it to the main decking beam. I plan on putting something small around the front to hold it from falling out.


As a side note, my plywood came in today and I have it mostly cut except for the hatch. 

Tuesday, August 13, 2013

Plywood Decking Started

Over the last few days I was able to accomplish a few things. First, I put another coat of epoxy in a few dry areas of the sub-decking and transom. I also epoxied the plywood bench to it's support beams. I originally thought it would be nice to remove the bench but I wasn't able to think of a good reason of doing so besides cleaning.

Next, I figured out the cable and pulley system and found where my pulleys should be fastened. I have only seen a few cable and pulley setups at boat shows and a few others online. It seems there are two different ways to set it up. One with the cable ends fastened to a spring and then directly to the outboard, and a second with  the cable and spring fastened to the transom and pulleys attached to the outboard. I went with the cables and springs fastened directly to the outboard because of the height with the raised transom (though this may change). After I've painted I'll post a diagram and pictures of how I did it.

The last project I started on was the 1/4" plywood decking. I had one 4' x 8' plywood board that I was hoping would cover most of the topside and I could use scrap for the rest, but it looks like I'll be purchasing another 4'x8 board. This will also make a more even and stronger finish. I left 1/4" on all sides for margin of error when I cut and it will easily sand down when I get closer to fastening it to the sub-decking. The plywood also does not fit width wise across the boat so I will use a scrap piece that will be supported by the coaming.

The pictures below show the placement of a rear pulley, the plywood decking cut, and the area where the scrap piece will fit on the coaming. As a side note, I will be placing mahogany veneer over the transom to cover up the screw holes.


Tuesday, August 6, 2013

Added Transom Height

With my 1957 Evinrude, the shaft length is slightly longer than the 20" standard used today (I believe post 1960). This meant to get the cavitation plate level to the bottom of the transom I would need to add some height. I was able to do so this weekend and am pretty happy with the results. I epoxied three pieces of 3/4" mahogany plywood and used 1 1/4" bronze screws to get a good grip through to the transom. You can see the two pieces I added on the front side, I had wanted to make that of one piece but didn't have enough wood to make it work. It still needs some shaping and sanding but overall it has a tight fit. Before I epoxied everything I had thought about getting a different outboard to use, something that would fit better, but now I'm glad I took this route. I can always take a saw and chop off the added height if I want to.

I also played around with the cable and pulley steering system and think I finally have it figured out. The problem I have been running into is the height of the outboard means the cable has to come down quite a bit to fit into the pulley. This means instead of drilling a small hole through the coaming, I may have to make a slit in the top of the decking between the coaming and the sheer. 


Saturday, July 27, 2013

Paint Ordered, Decking Ideas


The temperature dropped from the low 90's to the mid to low 60's so I haven't been able to do any epoxying as anything under 70 degrees is not recommended. Instead, I decided to take the plunge and purchase some primer and paint from JamesTownDistributors.com. I ended up going with  2 quarts of Interlux Primer Pre-Kote and 1 quart of Interlux Brightside Light Blue for the sides and Interlux Brightside White for the bottom. Since I will only be using the Squirt for a few hours at a time I decided to go with Brightside for the bottom instead of a bottom paint. I also received some good info from the Glen-L forum about which paints to use which is another reason I went this route. 

For application, I plan on doing at least 3 coats of primer on the bottom and sides. I really want to get a smooth and semi-professional looking finish so I'm hoping the primer will fill in any imperfections and give a good base for sanding. I then figure 2 coats for the Brightside paints should be good enough. 


If I have time this summer, I'm going to do the top decking, but as of right now that's still up in the air. If I'm not able to or don't want to do it this summer then I'll do it next spring; I still want to be able to launch and have some fun on it before it gets too cold. Below I made two designs of the decking I want to do. I'm not sure about the type of wood yet but I'm leaning towards white maple and African mahogany. I also have the hull color scheme I'm going to use, which has the correct color I purchased from Interlux. Hopefully I'll be able to update later this week with more progress. I'll also be pushing the calendar (right side of page) back until it warms up and I can get things done. 


Tuesday, July 23, 2013

Pulley/Cable Helm and Dashboard


Over the weekend I shaped the dashboard and made a tighter fit against the deck battens. The dashboard sits at a 20 degree angle, and as the middle deck batten is higher than the other two, it was a little difficult getting the right fit. A file worked really well for this process. I also made some support blocking pieces for the dashboard to sit against for added strength. They will be fastened to the coamings at the same time as the dashboard.

Once the dash was in I went ahead and drilled out the hole for the helm. I first sat in the boat and figured out where a comfortable position for the steering wheel would be and then made a mark for it. Once I put the helm into place I realized the wheel was a little too close to center and it would be a strange fit to be steering with two people in the boat. I then made a second hole that fit a lot better and the helm piece is large enough to cover the other hole up.

Next I went about adding height to the transom. It needs to be raised a little less than 3". I cut out some scrap plywood I had that will match the transom, but I'm not sure if that will be strong enough to hold. I was planning to put 2 large screws with epoxy to hold it in place, and then fiberglass as well. Now I'm thinking about finding a metal transom raiser that would be stronger. I'll look online at pricing and make a decision in the next day or two.

The pictures below show the helm and steering wheel in place as well as the outboard (which you can see sits a little low). The second picture shows how much fairing I'll need to do for the decking to fit right, though I'm sitting slightly lower than even with the bow so it's not quite as bad as it looks. On the right on this blog I set up a calendar which will show the fastening schedule I'm going to try and follow. I'm hoping for a splash date in 3 weeks, but we'll see how close I get to that. 


Friday, July 19, 2013

Hatch Sub-Decking and Seating Complete

After a lengthy break from moving, camping, and fishing, I have been able to put some time in again. The hatch sub-decking structure is complete along with the bench which includes the support beams. For the bench I put wood on top of the outer most battens and keel and then put two support beams across those. Once I epoxied those into place I put a coat on the bench board which is 1/4" African mahogany. The bench will not be fastened to support beams as I want to be able to remove the bench to clean and etc.

Next on the list is to finish the dashboard. I'll be really relieved when this part is over because it will be a main focus on the boat, and I don't want to mess it up. I also haven't installed the cable and pulley helm before so I need to get it right the first time. After the dashboard goes in, the pulleys will be next. Then I need to add about 2-3" to the transom to get the outboard cavitation plate in the right position to prevent and porpoising. Once that's complete I'll fair everything down, attach the deck (which will be plywood for now, next year I'll add some veneers and inlay), flip the boat, and get started on painting. Painting should be the last big thing left so I hope the weather holds off this weekend so I can get some work done.

First picture is the bench with a coat of epoxy on it, the second picture is of the hatch, and the third is with the bench in place.


Wednesday, June 19, 2013

Cable & Pulley Steering

I've been moving to a new house the last week and the garage I'll be doing my boat building work in needs some cleaning out and refurbishing (it has a slight lean that needs to be straightened out). I do have an update on the steering situation though.

 After deciding to go with the cable and pulley steering system I went on eBay and found pretty much everything I'm going to need. First, I bought the steering column which will hold the steering wheel, though I'm not sure if the steering wheel I currently have will fit because its not from the cable and pulley era. It looks like it has may fit but I'll need to take the column apart where it mounts to the dashboard. I'll update with better pictures once I'm moved in to the new house.

Secondly, I purchased some pulleys and the two spring connectors (not sure what they're called) as well as the components that connect to the outboard bracket, minus the actual steel piece. Overall this seems like it will be easier to put together than the Teleflex system. The only con of the pulley system I have read about so far is that there will be some feedback from the outboard. This means if I hit a wave and the outboard moves, my steering wheel will also move.

First picture is of the steering column and the second is of the pulleys and other components. (The second picture is from the eBay posting as there was a problem with the shipping and it hasn't arrived yet.)


Tuesday, June 4, 2013

Hatch Beams and a Boat Show

The past week or so I have been working on the hatch, which is directly behind the bench. This was probably one of the more frustrating parts of the build as there are a lot of pieces. There are 4 beams width wise, 2 beams length wise, and 4 square spacers that all fit between the coamings. What made it hard was dry-fitting everything, because once you added a support beam, the coaming would get pushed out just enough to make the other beams fall down. I realized the importance of a good fit and one that didn't need to be pushed, but rather placed, into position. I will be fastening the beams in position by twos to make it easier. Hopefully the pictures will do a better job at explaining what I'm talking about. I also replaced the dashboard and was a lot happier with the grain and the fairing I did to make it fit.

I also participated in the 2013 Spring Lake Wooden Boat show this past Saturday and had a lot of fun showing an "in-progress" boat, as well as talking to other boat builders and getting their inputs and recommendations. It was pretty cool talking to other people about boat building who have the same passion for it that I've found. I talked to some people about my steering problem and most of them recommended the cable and pulley system, even though I already bought the Teleflex system. I've been looking at pricing and may just buy the pulley system and get it done with.

Below shows my boat and outboard and in the show, and some of the hatch beams.


Saturday, May 25, 2013

Bench, Dashboard, and More

I decided to enter into the Spring Lake Wooden Boat Show next week so I made it a priority to skip out on some weekend festivities to get some work done. Sadly, I spent most of the day updating equipment with new saw blades and out at home Depot buying some router bits so I can  shave the 90 degree angle off the soon to be put in dashboard. I finally finished putting the bench in, which is only 1/4 plywood, and put two support beams in that sit on the outer most battens. To do this I built up some wood under each batten; nothing special but works well. I then put in the support beam for the seating bench and the support beam for the splash well. The coamings weren't perfectly straight (twisted in some spots) so I had to keep running back and forth between the angle grinder, table saw, and hand plane until I get everything to fit just right. I ended with the dashboard but I'm not completely happy with the grain that will be showing. I may replace it  and then use the current one for the support beams for the hatch.

On another note, I'm really struggling with the steering system. The steering wheel I bought doesn't seem to fit the helm and despite the cable having enough give and take, it looks like the outboard will barely turn when fully extended. Next week at the boat show I'm going to ask for suggestions and if I don't have any luck there I'll head over to the Glen-L forum.

The picture below is me sitting in it for the first time. It felt really good to hold the steering wheel in place and get a feel for how small it really is, or should I say cozy. My job should be slowing down so I'm hoping to have some time later in the day to do some boat work.


Wednesday, April 24, 2013

Steering


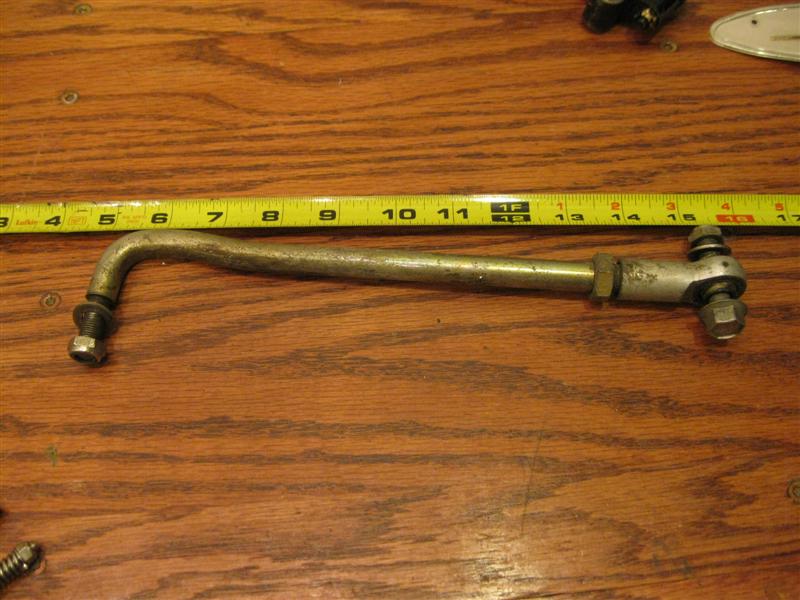
I spent sometime the last few days, when it hasn't been raining, working on the steering. I ordered a steering link arm ($12) to attach from the steering cable to the outboard, but I'm not yet convinced it was the right part. I mounted the outboard to the transom and tried to do a dry run and see how far the steering cable would push the outboard, but it doesn't seem like there is a very big turn radius.

I also checked the location of the cavitation plate to the bottom of the transom and it looks like the outboard is about 3" low. This means I'll have to fasten/epoxy/fiberglass a piece of wood to the top of the transom to make up for the difference. If I don't I'll likely end up with porpoising and poor planing performance. Next week is looking to be low 60's all week so I'll be able to get some more work done. The garage the boat is currently in is a very tight fit and makes it hard to do any work. Below shows the outboard mounting and some of the steering components and the steering link arm I purchased.


Saturday, March 30, 2013

Fresh Air

I took advantage of the weather today and moved my Squirt out of the storage unit and into a garage at my parents place. It's not very big but I can get the electrical and steering set up. I'm currently looking into where I'm going to mount speakers, the gas tank, and the battery. I'm also trying to decide if I want to add some pockets on the inside wall. I'm not sure how I'm going to wire everything up yet either so that's what I'll be researching this next week. 

Activities on the list for the near future will be; dashboard, steering wheel/steering cables, throttle/shifter, engine mounting, battery location, speakers, bench seating, and some more encapsulation in some areas that need more or have yet to have any. Shouldn't take long, right? Hoping for a mid summer splash date. 


Monday, December 10, 2012

Expenses, All of Them

Over the course of this project I've kept every receipt and recently totaled up the costs. The first image shows my expenses, including the outboard, gas tank, books, and some tools I needed. The second picture shows the cost if I wouldn't have purchased the outboard and etc., and had just bought the materials needed. Keep in mind that these prices have been spread out since April of 2010. It should also be noted that I gained a huge amount of knowledge from this thus far so the experience in itself is worth it.

The only costs left that I can think of are paint, topside decking wood, a few pieces of hardware, and some more epoxy. I'm sure there will be a few unexpected items that will be need though as well.


Saturday, December 8, 2012

Trailer Fitted

Here are some pictures after I made some adjustments to the trailer; it had previously been used to haul around a 13' Zodiac hard-bottom. It fits great and it looks awesome; Glen-L did a great job on designing the lines of this boat. There isn't a hook on the front of the Squirt but I was able to tie it down and that seems to work. You can see I haven't sanded the fiberglass down yet but that'll have to wait until I find a new place to work on it since my parents sold their house. Next on the list is to finish the seating, install the dashboard and components (which I have purchased), build the rear hatch and splash-well, and add a few more coats of epoxy to the inside. Once that's all complete I'll put the plywood on the top, and figure what kind of wood outlay I'm going to use for design and color. My last step will be flipping it over and sanding and painting the hull, I'm thinking of a white/blue combination. 


Friday, December 7, 2012

Encapsulation: 2 Coats

This is the inside after two coats of epoxy. The wood must have been really dry because it soaked it up like nothing. I did go light though because I was afraid to have it clump up in certain areas. I'll put at least one more coat on, and then a fourth if I'm not happy with it. This is when I wish I would have coated all of the panels before I installed them. It would have made this a lot easier and saved me some time, but it's all a learning process. Underneath the towel is where the bench will be installed, though it will not be epoxied down because I want to be able t remove it if I need to get under it for any reason. I'm not 100% on how I'm going to fasten it yet but I'll get to that when it comes. 


Friday, August 10, 2012

Seating Started

These pictures were taken in August. I got busy with school and moving apartments so I'll be updating with more pictures and a spread-sheet of my costs thus far. The pictures below show the deck framing done, but still needs to be faired; that'll come when I install the plywood. I cute out the seat with is 1/4" mahogany plywood, with is pretty flimsy for a seat I thought. I have supports running underneath though so it should be pretty solid. My brother works in an office furniture company and can be me some left over foam that I'll glue to the board and then wrap with fabric. 

I'll update with more pictures of the boat on the trailer, the interior epoxied, and the total costs later this weekend and into next week. 


Tuesday, July 24, 2012

Topside Started

The past two weeks not much was done. I flipped it, sanded down the excess fiberglass, encapsulated from frame #1 to the transom, and dry fit some wood. The first piece instructed to go on were the coamings. The wood used for this is 1x6, I believe, and about 5' long. It also has a pretty major bend so I soaked both pieces over night and dry fit the next day. This was definitely a two man job as I was constantly taking the coamings on and off to get the perfect fit. I also cut the deck battens, though I cut one too short and will have to make another cut. The dashboard is 12'' from frame #2 and I didn't look far ahead enough to see this.

Here are a few pictures of the progress. I hope to have the topside complete and be able to move onto the actual decking by the end of the weekend. I had previously wanted to African Mahogany king planks with a lighter colored wood in between, but summer is coming to an end I want to be able to have it launched before I go back to WMU in the fall. Therefore, I will be doing the deck as just the mahogany plywood, and then over winter I will install the better looking decking. Sorry for the poor quality on the bottom picture, I took it as I was rushing out the door on the way to class. I'll have better ones up after this weekend.