Squirt Plans

Squirt Plans

Wednesday, April 24, 2013

Steering


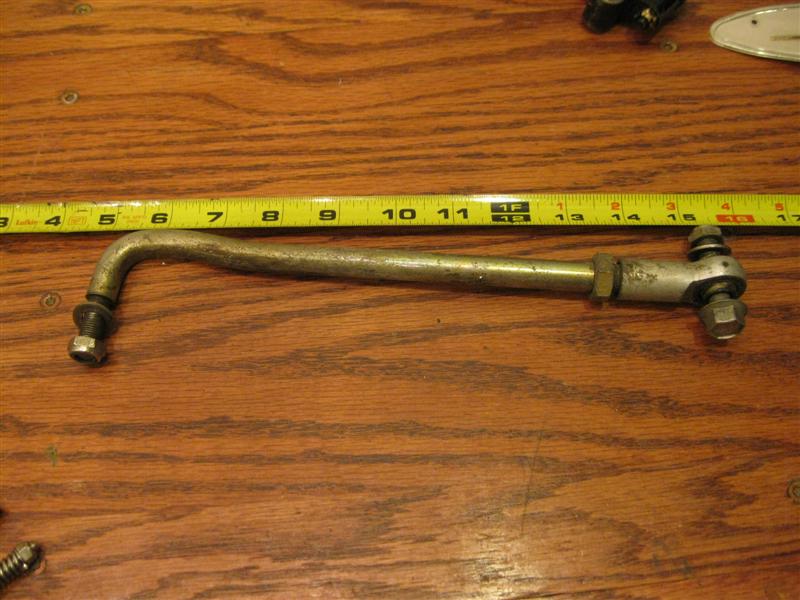
I spent sometime the last few days, when it hasn't been raining, working on the steering. I ordered a steering link arm ($12) to attach from the steering cable to the outboard, but I'm not yet convinced it was the right part. I mounted the outboard to the transom and tried to do a dry run and see how far the steering cable would push the outboard, but it doesn't seem like there is a very big turn radius.

I also checked the location of the cavitation plate to the bottom of the transom and it looks like the outboard is about 3" low. This means I'll have to fasten/epoxy/fiberglass a piece of wood to the top of the transom to make up for the difference. If I don't I'll likely end up with porpoising and poor planing performance. Next week is looking to be low 60's all week so I'll be able to get some more work done. The garage the boat is currently in is a very tight fit and makes it hard to do any work. Below shows the outboard mounting and some of the steering components and the steering link arm I purchased.



Saturday, March 30, 2013

Fresh Air

I took advantage of the weather today and moved my Squirt out of the storage unit and into a garage at my parents place. It's not very big but I can get the electrical and steering set up. I'm currently looking into where I'm going to mount speakers, the gas tank, and the battery. I'm also trying to decide if I want to add some pockets on the inside wall. I'm not sure how I'm going to wire everything up yet either so that's what I'll be researching this next week. 

Activities on the list for the near future will be; dashboard, steering wheel/steering cables, throttle/shifter, engine mounting, battery location, speakers, bench seating, and some more encapsulation in some areas that need more or have yet to have any. Shouldn't take long, right? Hoping for a mid summer splash date. 


Monday, December 10, 2012

Expenses, All of Them

Over the course of this project I've kept every receipt and recently totaled up the costs. The first image shows my expenses, including the outboard, gas tank, books, and some tools I needed. The second picture shows the cost if I wouldn't have purchased the outboard and etc., and had just bought the materials needed. Keep in mind that these prices have been spread out since April of 2010. It should also be noted that I gained a huge amount of knowledge from this thus far so the experience in itself is worth it.

The only costs left that I can think of are paint, topside decking wood, a few pieces of hardware, and some more epoxy. I'm sure there will be a few unexpected items that will be need though as well.


Saturday, December 8, 2012

Trailer Fitted

Here are some pictures after I made some adjustments to the trailer; it had previously been used to haul around a 13' Zodiac hard-bottom. It fits great and it looks awesome; Glen-L did a great job on designing the lines of this boat. There isn't a hook on the front of the Squirt but I was able to tie it down and that seems to work. You can see I haven't sanded the fiberglass down yet but that'll have to wait until I find a new place to work on it since my parents sold their house. Next on the list is to finish the seating, install the dashboard and components (which I have purchased), build the rear hatch and splash-well, and add a few more coats of epoxy to the inside. Once that's all complete I'll put the plywood on the top, and figure what kind of wood outlay I'm going to use for design and color. My last step will be flipping it over and sanding and painting the hull, I'm thinking of a white/blue combination. 


Friday, December 7, 2012

Encapsulation: 2 Coats

This is the inside after two coats of epoxy. The wood must have been really dry because it soaked it up like nothing. I did go light though because I was afraid to have it clump up in certain areas. I'll put at least one more coat on, and then a fourth if I'm not happy with it. This is when I wish I would have coated all of the panels before I installed them. It would have made this a lot easier and saved me some time, but it's all a learning process. Underneath the towel is where the bench will be installed, though it will not be epoxied down because I want to be able t remove it if I need to get under it for any reason. I'm not 100% on how I'm going to fasten it yet but I'll get to that when it comes.